Comment ouvrir un flacon pompe de lotion
Menu Contenu
● The Enemy Within: Understanding Lotion Pump Mechanics
● The Perpetrators: Common Lotion Pump Problems
● The Liberation Plan: Techniques to Conquer the Pump
>> 1. The Basics: Relieving Air Pockets and Clogs
>> 2. Advanced Maneuvers: Addressing More Complex Issues
>> 3. The Final Frontier: Replacing the Pump
● Beyond the Bottle: Preventative Measures
● The Lotion Liberation Manifesto
Ah, the humble lotion bottle. A seemingly simple object, promising silky smooth skin and a comforting scent. Yet, within its plastic confines often lies a hidden frustration: the elusive, sometimes impossible-to-operate pump. It’s the nemesis of smooth, efficient skincare routines, leaving us wrestling with the bottle, our nails digging in, frustration mounting. But fear not, fellow lotion lovers, for we’re about to embark on a journey to liberate your lotions and conquer those stubborn pumps.

This article isn’t just about opening a bottle; it’s about reclaiming your lotion experience. We’ll delve into the intricacies of pump mechanics, explore common frustrations, and equip you with a comprehensive arsenal of techniques to master even the most defiant pump.
The Enemy Within: Understanding Lotion Pump Mechanics
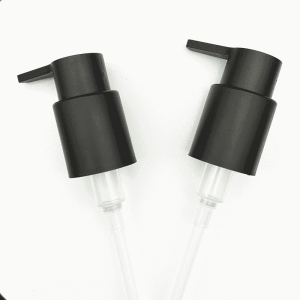
The seemingly simple pump is actually a marvel of engineering, with several parts working in concert to dispense your lotion. The key components include:
- The Pump Head: The part you press to activate the pump. It can be made of various materials, from plastic to metal, and often houses the spring mechanism.
- The Spring: This coiled piece of metal provides the force needed to push the lotion out. A weakened or broken spring can lead to poor performance.
- The Plunger: A cylindrical piece that moves up and down within the pump, driven by the spring. This is what actually sucks the lotion up and forces it out.
- The Tube: The passageway connecting the pump to the bottle, carrying the lotion from the bottle to the pump head.

The Perpetrators: Common Lotion Pump Problems
Now that we understand the mechanics, let’s identify the culprits behind our frustrations:
- Air Pockets: Sometimes, air gets trapped inside the pump or the tube, blocking the flow of lotion. This is often seen as a lack of lotion being dispensed or a “clicking” sound without any output.
- Clogged Tubes: This can happen due to dried lotion residue or even small particles from the lotion itself. A clogged tube prevents the plunger from drawing up lotion, leading to a dry pump.
- Weak or Broken Spring: A worn-out spring won’t exert enough force to push the lotion out, resulting in weak or inconsistent dispensing.
- Misaligned Plunger: If the plunger is not properly positioned within the pump, it may not be able to draw up lotion effectively.
- Stuck Pump Head: This can happen when the pump head becomes stiff or jammed, preventing it from moving freely.
The Liberation Plan: Techniques to Conquer the Pump
Fear not, for there are tried and true methods to defeat even the most stubborn lotion pump. Let’s dive into our comprehensive liberation plan:
1. The Basics: Relieving Air Pockets and Clogs
- Inversion Therapy: Simply turn the bottle upside down and pump it several times. This allows any trapped air to escape and helps push out any accumulated lotion.
- The Warm Water Bath: Immersing the entire bottle in warm water for a few minutes can help soften any hardened lotion residue and free up clogs.
- The Needle Technique: Carefully insert a thin needle into the pump’s opening. This can help dislodge any clogging material. Be cautious not to damage the pump.
Picture This: [Insert pictures demonstrating each of these techniques]
2. Advanced Maneuvers: Addressing More Complex Issues
- The Plunger Reset: If the plunger seems stuck, try gently pushing it down with a small object like a pen or a straightened paper clip. This can help reposition it within the pump.
- The Spring Refresh: If you suspect a weak spring, you can try gently tapping the bottom of the pump to see if it helps. However, this is more of a temporary solution, and a new pump might be needed.
- The Pump Head Liberation: For a stuck pump head, you can try gently wiggling it back and forth or applying a bit of oil around the base to lubricate it.
Picture This: [Insert pictures demonstrating each of these advanced techniques]
3. The Final Frontier: Replacing the Pump
If all else fails, there’s always the option of replacing the pump. Many lotion bottles have replaceable pump heads, which can be easily purchased online or at most drugstores. Just be sure to get a replacement pump that is compatible with your bottle.
Beyond the Bottle: Preventative Measures
Now that you’ve conquered your lotion pump, let’s ensure future smooth sailing. Here are a few preventative measures to keep those pumps flowing freely:
- Store your lotion upright: This helps prevent air from getting trapped in the pump.
- Clean your pump regularly: Wipe down the pump head and tube with a damp cloth after each use to prevent lotion build-up.
- Avoid extreme temperatures: Heat and cold can affect the performance of the pump.

The Lotion Liberation Manifesto
With these techniques and preventative measures, you can finally conquer those frustrating lotion pumps. No more wrestling, no more nail-biting, just smooth, efficient dispensing every time. You’ve earned the right to enjoy the silky touch of your favourite lotion without a struggle. Remember, your lotion deserves to be liberated, and you deserve a stress-free skincare routine. So, go forth, conquer those pumps, and embrace the joy of smooth, moisturized skin!
